

How To Separate A Template To Different Sections Gimp
2.2. New…
Using the "Create a New Image" dialog, you can create a new empty image and gear up its properties. The prototype is shown in a new paradigm window. You may have more one prototype on your screen at the aforementioned time.
2.2.1. Activate the command
-
You can access the command in the Epitome menu through: → ,
-
or past using the keyboard shortcut Ctrl + N .
2.2.2. Basic Options
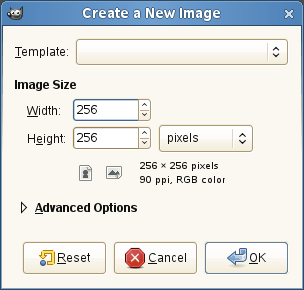
Figuur sixteen.four. The "Create a New Image" dialog
- Template
-
Figuur 16.5. The "Template" dialog
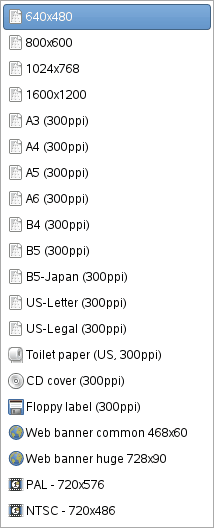
Rather than entering all the values by paw, yous can select some predefined values for your image from a carte of templates, which represent image types that are somewhat commonly useful. The templates ready values for the size, resolution, comments, etc. If there is a item image shape that you apply ofttimes and information technology does not appear on the list, you can create a new template, using the Templates dialog.
- Prototype Size
-
Here y'all set the Width and Height of the new prototype. The default units are pixels, simply you can cull a different unit if you prefer, using the adjoining card. If yous do, note that the resulting pixel size is adamant by the X and Y resolution (which you can alter in the Avant-garde Options), and by setting "Dot for Dot" in the menu.
If no image is open, the "New" paradigm is opened in the empty image window, with the default size you lot accept determined. If you open up the "New"image when another is open (or has been), then it is opened in some other window, with the same size as the first paradigm.
![[Opmerking]](https://docs.gimp.org/2.8/nl/images/note.png)
Opmerking Keep in mind that every pixel of an image is stored in memory. If yous create large files with a high pixel density, GIMP will need a lot of time and memory for every office you apply to the image.
- Portrait/Mural buttons
-
There are two buttons which toggle betwixt Portrait and Landscape mode. What they actually do is to commutation the values for Width and Height. (If the Width and Summit are the same, these buttons are non activated.) If the 10 and Y resolutions are not the same (which you can fix in Avant-garde Options), so these values are besides exchanged. On the correct of the dialog, image size, screen resolution and colour space are displayed.
ii.ii.3. Avant-garde Options
Figuur sixteen.six. New Epitome dialog (Advanced Options)
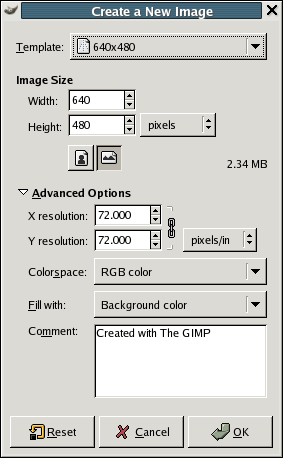
The Advanced Options are by and large of involvement to more than advanced GIMP users. You can display these options by clicking on the small triangle on the lower edge of the dialog window.
- 10 and Y resolution
-
The values in the X resolution and Y resolution fields chronicle mainly to printing: they do non impact the size of the image in pixels, simply they may determine its physical size when it is printed. The X and Y resolution values can determine how pixels are translated into other measurement units, such every bit millimeters or inches.
![[Tip]](https://docs.gimp.org/2.8/nl/images/tip.png)
Tip If you want to display the image on the screen at the correct dimensions, select → Set up the zoom factor to 100% to see the image at its truthful screen size. The calibration of the screen size is normally done when GIMP is installed, but if the image does not display at the correct size, yous may take to adjust the screen parameters in the GIMP. You tin do this in the Preferences dialog.
- Colorspace
-
You can create the new image in different color modes, as either an RGB image or a grayscale image.
- RGB color
-
The prototype is created in the Crimson, Dark-green, Blue color organization, which is the one used by your monitor or your television screen.
- Grayscale
-
The prototype is created in blackness and white, with various shades of grey. Aside from your artistic interests, this type of image may be necessary for some plug-ins. Nevertheless, the GIMP allows you to change an RGB prototype into grayscale, if you would like.
You cannot create an indexed image directly with this carte du jour, but of grade y'all tin can e'er convert the image to indexed fashion after it has been created. To exercise that, use the → → control.
- Make full
-
Here, you specify the background colour that is used for your new image. It is certainly possible to alter the background of an image afterward, too. You lot tin find more information well-nigh doing that in the Layer dialog.
At that place are several choices:
-
Fill up the paradigm with the current Foreground color, shown in the Toolbox.
Annotation that y'all can modify the foreground color while the "New Image" dialog window is open.
-
Fill the paradigm with the electric current Background color, shown in the Toolbox. (You tin change the background color too, while the dialog window is open.)
-
Fill the epitome with White.
-
Fill the image with Transparency. If yous choose this option, the paradigm is created with an blastoff channel and the background is transparent. The transparent parts of the image are and so displayed with a checkered pattern, to indicate the transparency.
-
- Comment
-
Yous can write a descriptive comment here. The text is fastened to the prototype as a parasite, and is saved with the image by some file formats (PNG, JPEG, GIF).

How To Separate A Template To Different Sections Gimp,
Source: https://docs.gimp.org/2.8/nl/gimp-file-new.html
Posted by: talbottume1968.blogspot.com
0 Response to "How To Separate A Template To Different Sections Gimp"
Post a Comment